Food for Thought

Charcoal Grill vs. Gas Grill

July 28, 2015

The debate of Charcoal vs. Gas has been going on for decades and there’s a reason the answer isn’t finite…it’s because BOTH have their pros and cons. Many people root for one or the other, but like most things in life, there is a spectrum. Hopefully I can help you make an informed choice of your own by pointing out the benefits and drawbacks of both, starting with gas.

Screen Shot 2015-07-21 at 12.25.03 PM

Gas grills are simply convenient. They take little to no prep time.  Simply turn a dial and go! Temperature control is more precise, not 100% (various weather conditions and poorly located temp gauges can cause unreliable temps), but still, maintaining a temperature range over longer periods of time is much easier and more accurate with a gas grill. No need to stop grilling in between slow cooking, like you have to do when it comes time to change out burnt up charcoal for fresh briquettes. Cleaning is also a breeze compared to charcoal—still required if you want to maintain your investment, but very simple in comparison. Zone cooking is as simple as adjusting a couple of dials. Makes cooking multiple items with different heat requirements no problem at all. The biggest draw back of a gas grill revolves around flavor…

Barbecue grill flame

In that regard, it’s important to note that gas grills come in multiple forms. Natural gas is more affordable and cleaner, but that requires a built in BBQ and plumbing to the home’s gas line. That’s why the most common type of gas used for grilling is propane and the biggest debate between using charcoal and propane focuses around flavor.One misconception is that propane will affect the taste of food; known as the “Mercaptan Myth.”

It’s important to know that natural gas and propane, in their natural form, are scentless.  Mercaptan is mixed with the gases to give off a strong odor—that way people can smell gas in case of a leak.  The misconception is that mercaptan will effect the taste of your food…that’s FALSE. Mercaptan, when heated, turns into sulfur dioxide, which becomes sulfuric acid. There is more sulfuric acid present in the meat itself and the seasoning you use than will ever be produced by grilling with propane. So what’s the drawback then? The drawback is…charcoal can affect the flavor of food, and die-hard charcoal users will tell you it makes all the difference in the world! And perhaps it does…

Screen Shot 2015-07-21 at 1.02.35 PM

The main difference between gas, charcoal, and the flavors they produce, is smoke. Charcoal simply makes more smoke than gas.  Charcoal also contains cellulose and lignin, which contribute to the smoky flavor you get when cooking with it. The most important thing to note is that this flavor boost is only noticeable with food that is grilled low and slow.  For the typical day-to-day grilling, like BBQ hot dogs and burgers, there is simply not enough time, or exposure, to the charcoal smoke to make any notable flavor changes. That’s why many people will prefer to use a gas grill for quick BBQ tasks.  That and the cleanup and startup of a charcoal grill is much more involved. Charcoal can be difficult to light and takes more time to reach desired temperatures than gas.  That and a charcoal grill must be shoveled and cleaned out after every use if you want to maintain your grill for the long haul.  

 Burning Charcoal Briquettes

The major pro and the reason this method of grilling is often preferred, doesn’t just surround the smoky taste charcoal provides.  Charcoal grills can reach temperatures almost double that of your average gas grill. Typically gas models top out at about 500ºF (of course more expensive ones can go higher/hotter), while charcoal grills can reach up to 900ºF! That’s highly desired when is comes to cooking food hot and fast, as well as producing the highly sought after all around sear without grill marks. Gas grills sometimes comes with a sear plate, but they tend to be VERY expensive and quite small.

Screen Shot 2015-07-15 at 4.10.01 PM 

Though the  lack of temperature control can be an issue for charcoal users, there is a method known as two-zone cooking and it’s a prevalent practice of avid charcoal users.  Simply put, only ignite half the grill with charcoal and place the food closer or farther from the flame to reach the temperature desired. Practice makes perfect and so can this method…perfect BBQ that is! 

At the end of the day, both methods have their pro’s and con’s, but the choice of which to choose can come down to two major components…flavor or convenience.  All this said, what’s you’re preferred method of grilling?

Main Course

BBQ Shrimp Po Boy

July 28, 2015

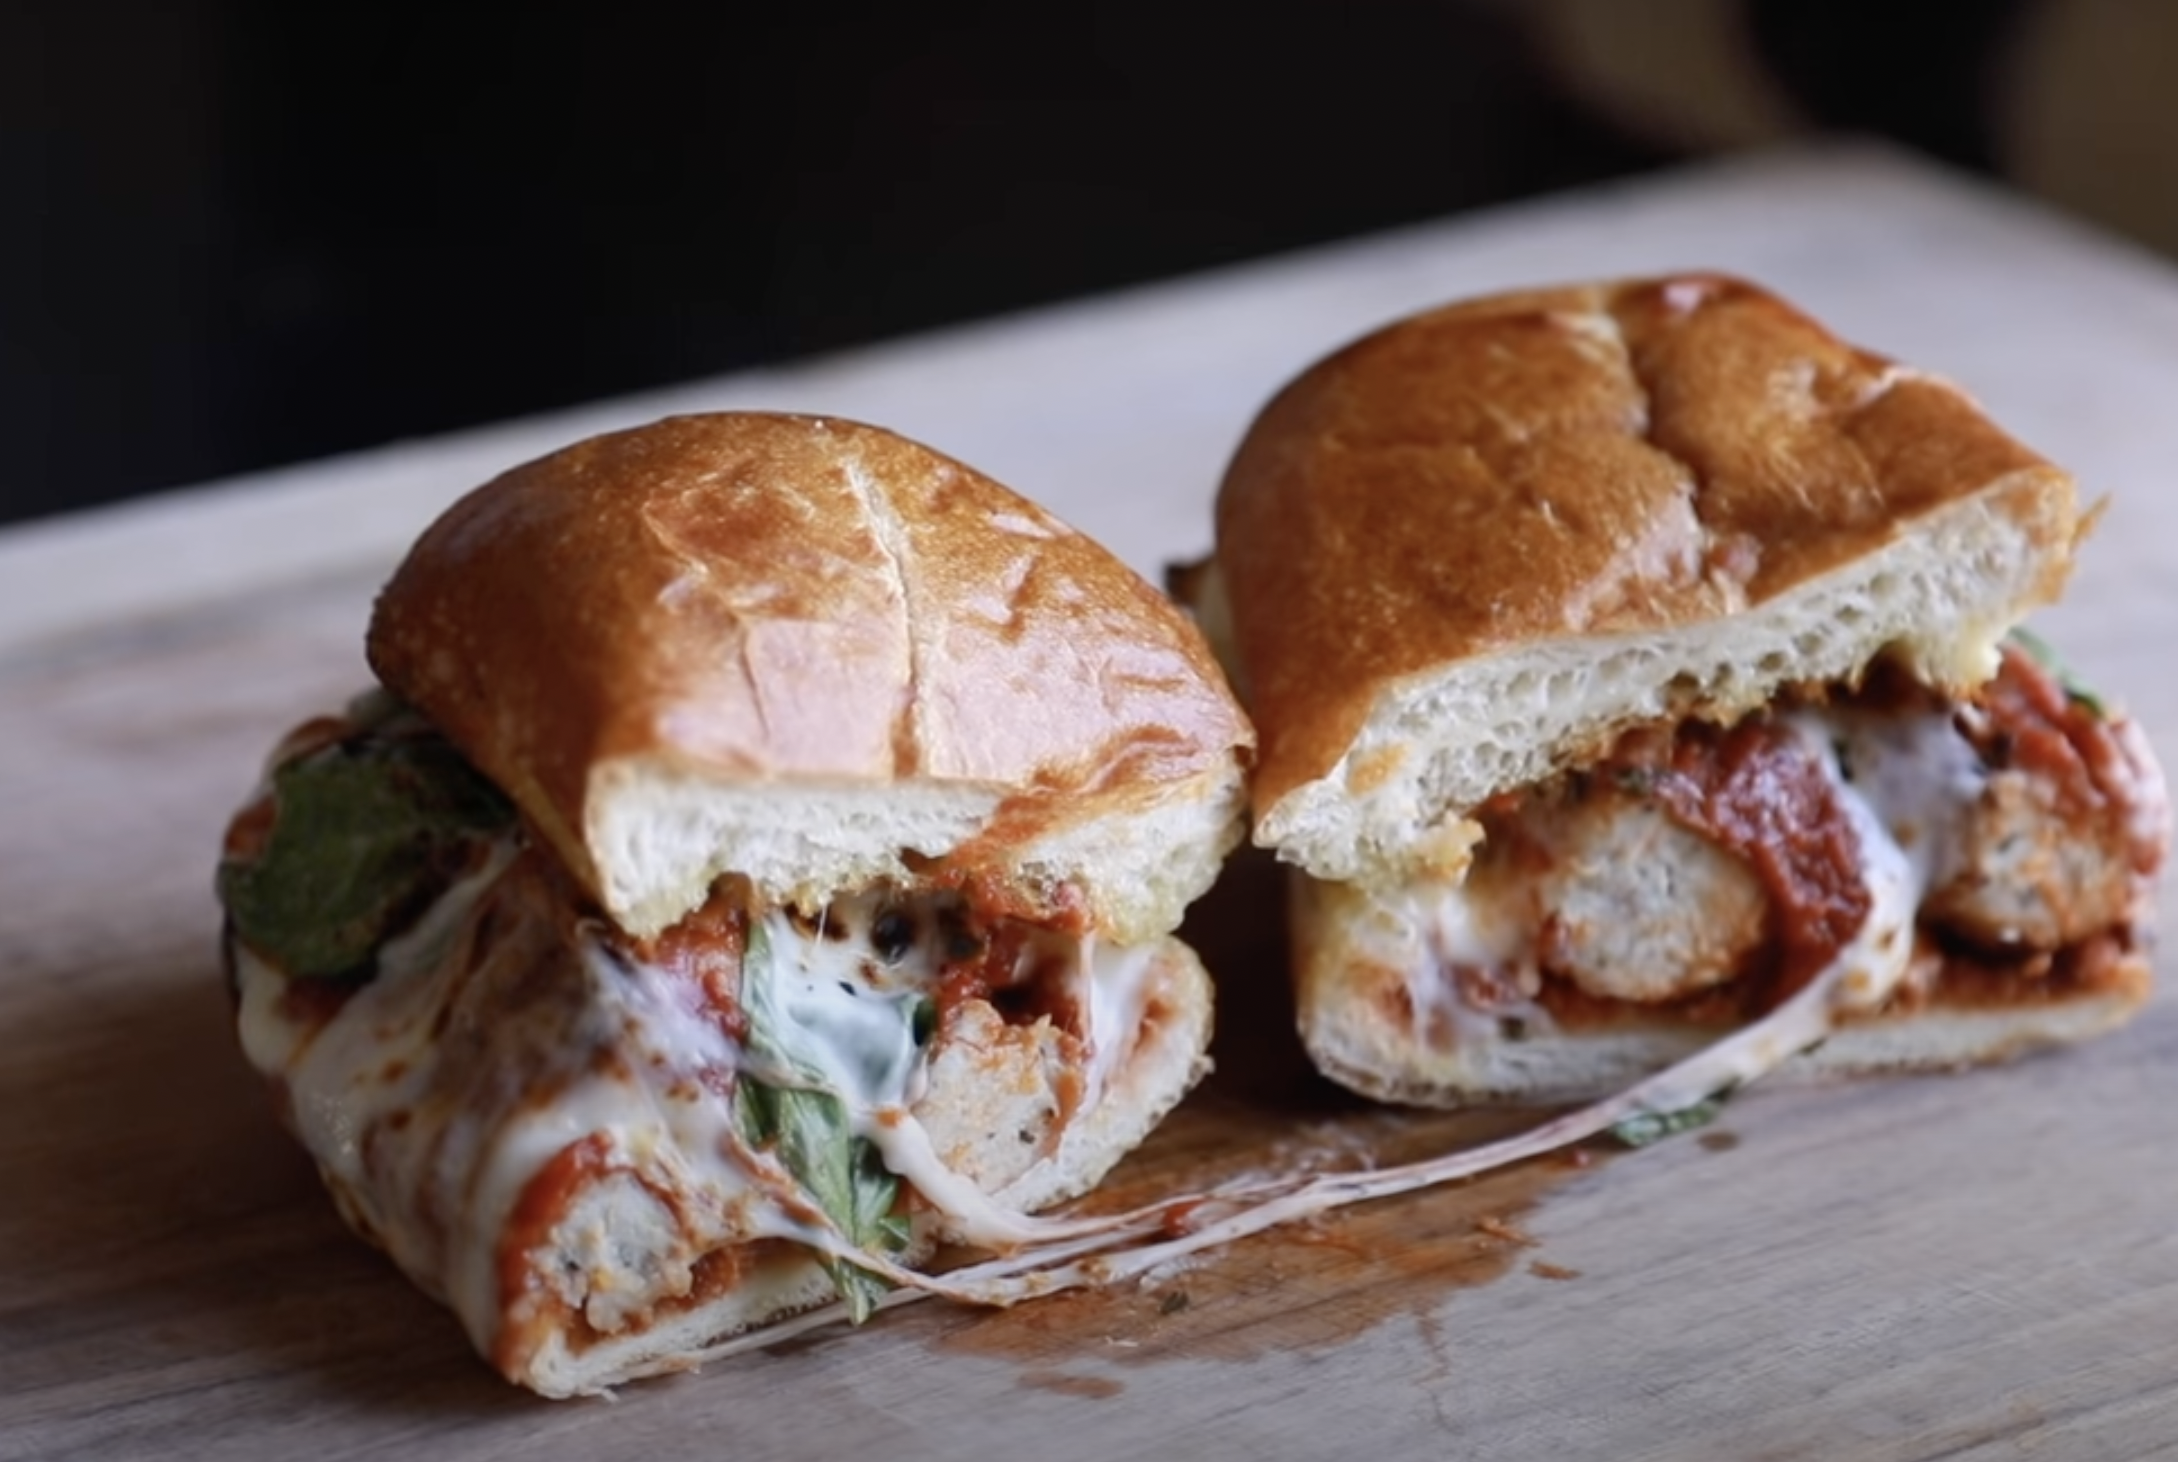
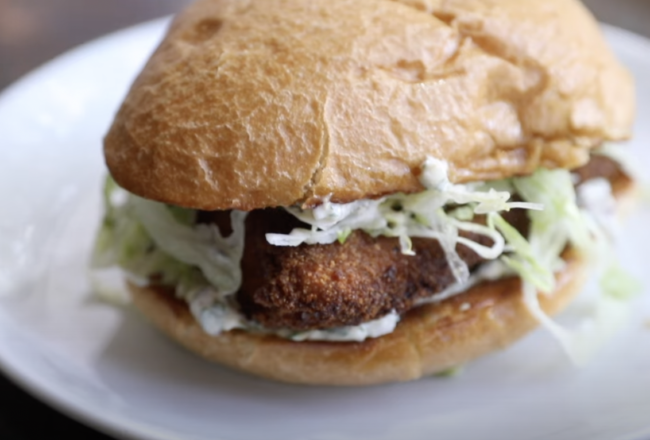
This is the fresh and easy summer recipe for family and friends to enjoy outdoors. The perfect grab and go sandwich, this BBQ Shrimp Po’ Boy is a true people pleaser!  Refreshing, yet spicy, with a hint of smoke, and a nice crunchy bite to it.  I’d make extra, because they go fast!

Screen Shot 2015-07-21 at 12.49.52 PM

In a medium mixing dish, add 1 tbsp of chopped tarragon…

Screen Shot 2015-07-21 at 12.50.54 PM

…1 tbsp of chopped thyme…

Screen Shot 2015-07-21 at 12.51.46 PM

…1 tbsp minced garlic…

Screen Shot 2015-07-21 at 12.52.30 PM

…zest of a lime…

Screen Shot 2015-07-21 at 12.52.41 PM

…1 tsp cayenne pepper…

Screen Shot 2015-07-21 at 12.56.22 PM

…2-3 tbsp olive oil…

Screen Shot 2015-07-21 at 12.57.03 PM

…pinch of salt…

Screen Shot 2015-07-21 at 12.57.33 PM

…fresh pepper…

Screen Shot 2015-07-21 at 12.58.15 PM

…and 1/2 lb peeled & deveined shrimp. Give this a good mix.

Screen Shot 2015-07-21 at 12.58.45 PM

Using wood skewers, insert the screwers into several shrimp. Once done, refrigerate shrimp until ready to grill.

Screen Shot 2015-07-21 at 12.59.21 PM

To make the Chili-Lime Remoulade, add 1 tbsp mined jalapeño…

Screen Shot 2015-07-21 at 12.59.39 PM

…1tbsp chopped cilantro…

Screen Shot 2015-07-21 at 12.59.51 PM

…2 tbsp lime juice…

Screen Shot 2015-07-21 at 1.00.51 PM

…1 tbsp chili powder…

Screen Shot 2015-07-21 at 1.00.20 PM

…and 1/2 cup mayonnaise…

Screen Shot 2015-07-21 at 1.00.35 PM

…1 tsp cayenne pepper to a small mixing bowl.

Screen Shot 2015-07-21 at 1.01.18 PM

Give this a good mix…

Screen Shot 2015-07-21 at 1.01.57 PM

…and transfer to a squeeze bottle for easy application.

Screen Shot 2015-07-21 at 1.02.35 PM

Heat the grill on high and add the cold shrimp directly on top of the heat.

Screen Shot 2015-07-21 at 1.03.32 PM

Grill both sides for about 3-4 minutes on each side.

Screen Shot 2015-07-21 at 12.25.03 PM

Careful not to overcook.

Screen Shot 2015-07-21 at 1.05.12 PM

While the shrimp cooks, slice your bread rolls down the middle. Put them on the grill for a quick toast.

Screen Shot 2015-07-21 at 1.19.07 PM

When everything is done, remove the rolls and shrimp from the grill.

Screen Shot 2015-07-21 at 1.23.04 PM

Cut the shrimps in half (lengthwise)…

Screen Shot 2015-07-21 at 1.23.40 PM

…and place several halves inside the roll.

Screen Shot 2015-07-21 at 1.24.39 PM

Top the rolls with a healthy serving of the Chili Lime Remoulade…

Screen Shot 2015-07-21 at 1.29.47 PM

…and a simple crunchy salad (recipe below).

Screen Shot 2015-07-21 at 1.30.17 PM

All that is left, it to enjoy! 

[amd-zlrecipe-recipe:51]

Screen Shot 2015-07-21 at 2.10.18 PM

 | Top Left: Glass Bowl Set | Middle: Wood Skewers | Middle: Cleaver | Top Right: Serving Dish |

| Bottom Left: Boos Cutting Board | Bottom Right: Grill |

Food for Thought

The Science of Cooking BBQ: Slow vs. Fast

July 21, 2015

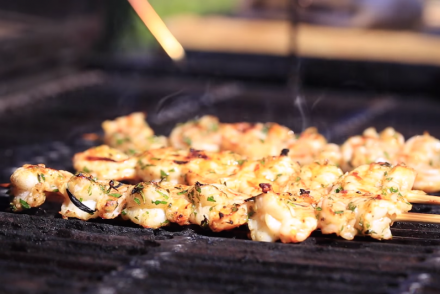
Believe it or not, there is a science to BBQ. If ever a better moment to dive into it, #BBQWeek is just the time! Starting with perhaps the most scientific concept of BBQ…the “Maillard Reaction.”

The Maillard Reaction, is when proteins on the surface of a meat interact and recombine with the sugars of the meat. To expand, this only happens when meat reaches a temperature between 300-500° F. The outside becomes significantly hotter than the inside, triggering the Maillard reaction, which results in the changing of meat color (typically pink to brown) and overall flavor of the well-cooked meat vs. rare vs. raw. 

Screen Shot 2015-07-15 at 4.10.01 PM


Fast Cooking, or cooking in a quick manner, is only “better” for meats that cook through quickly. If you were to put a brisket over a hot BBQ, the result would be a chard exterior and a next to raw/rare interior. When it comes to leaner items like thin cuts of meat, seafood, lean patties, ect…they cook through very quickly. If you want to get a solid sear without over cooking the interior of the meat, it is absolutely necessary to BBQ them hot and fast! The high heat will sear it right away, prior to the interior reaching temperatures that would result in an overcooked and dry meal.

For anything more substantial, like steaks, briskets, larger poultry, etc…slow and steady will always win the race—and it can all be explained with science!

Screen Shot 2015-07-20 at 4.39.08 PM


 Slow Cooking will result in that fall-apart, tender beyond belief, melt in your mouth type of BBQ!  The reason is simple.  Connective tissue in meat contains collagen, which makes the muscle fibers of meat tough and constricted. Cooking meat at a low temperature gives the collagen enough time to convert to a gelatin (at about 160° F), allowing the muscle fibers that have been bound tightly together to loosen and literally pull apart—since the connective tissue is now soluble.

Think of a nice steak house…they don’t offer heavy duty steak knives. Why? Because well cooked meat (slow cook meat) should fall apart without effort. When meat is cooked too quickly this process doesn’t have time to occur—resulting in a cooked, but tough product. By slow cooking, meat has enough time to become tender. The rendered fat and soluble gelatin also make for one JUICY cut of meat!

Screen Shot 2015-07-15 at 4.07.22 PM


 At the end of the day, the choice is yours to slow cook or fast cook, but hopefully now you have a better grasp as to what actually occurs during the cooking process and how that will affect the overall taste and texture of your BBQ. Practice makes perfect!

Main Course

BBQ Ribs

July 15, 2015

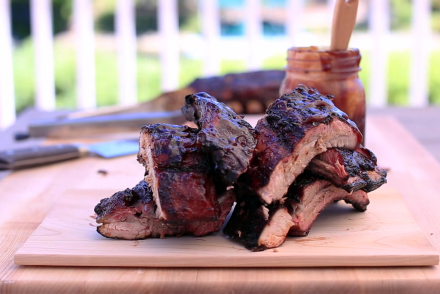
Kicking off #BBQWeek with some smoky and  sticky Baby Back Ribs!! Not one to boast too much, but…my rib game is on par!
These are INSANELY delicious, packed with smoky flavor, and yield the most tender ribs! I definitely recommend you try these for yourself and let me know what you think.  Hope you enjoy!

Screen Shot 2015-07-15 at 3.54.32 PM

Start by making the rub.  Mix together 1 tbsp garlic powder…

Screen Shot 2015-07-15 at 3.53.53 PM

…1 tbsp chili powder…

Screen Shot 2015-07-15 at 3.56.00 PM

…1 tbsp cayenne pepper…

Screen Shot 2015-07-15 at 3.54.59 PM

…1 tbsp spanish paprika…

Screen Shot 2015-07-15 at 3.56.50 PM

…1 tbsp celery salt…

Screen Shot 2015-07-15 at 3.57.04 PM

…1 tbsp kosher salt…

Screen Shot 2015-07-15 at 3.56.34 PM

…1 tbsp black pepper…

Screen Shot 2015-07-15 at 3.54.49 PM

…1 tbsp onion powder…

Screen Shot 2015-07-15 at 3.54.12 PM

…1 tbsp ground cumin…

Screen Shot 2015-07-15 at 3.58.13 PM

…and 1/4 cup of brown sugar. 

Screen Shot 2015-07-15 at 3.59.00 PM

Once mixed, lay out the baby back ribs on a dry surface.  Season the ribs with all of the rub mix.

Screen Shot 2015-07-15 at 4.00.02 PM

 Give the ribs a good rub on both sides.

Screen Shot 2015-07-15 at 4.02.48 PM

Heat the entire grill to high and began searing the ribs.  

Screen Shot 2015-07-15 at 4.04.50 PM

Sear on each side for about 5 minutes, or until both sides have solid chard grill marks.

Screen Shot 2015-07-15 at 4.05.21 PM

When both sides are seared, transfer the ribs to a baking sheet and turn half of the grill off and leave half on.  

Screen Shot 2015-07-15 at 4.05.48 PM

Move baking sheet to the off side of the grill…

Screen Shot 2015-07-15 at 4.07.08 PM

..and cover the pan of ribs loosely with foil. 

Screen Shot 2015-07-15 at 4.07.51 PM

With the other side on high heat, close the grill to begin “smoking” the ribs. Temperature should remain approximately 400°F for at least 3 hours.

Screen Shot 2015-07-15 at 4.07.22 PM

Add about a cup of water to the rib pan every 20 minutes of so.  This will prevent them from drying out.

Screen Shot 2015-07-15 at 4.08.19 PM

After 3 hours of cooking, the ribs should be nice and tender.  

Screen Shot 2015-07-15 at 4.09.18 PM

Place the ribs back on the grill, slather both sides in your favorite BBQ…

Screen Shot 2015-07-15 at 4.09.32 PM

…and let sear on each side for several minutes.

Screen Shot 2015-07-15 at 4.10.01 PM

Remove ribs from heat…

Screen Shot 2015-07-15 at 4.12.25 PM

…give them a final slather in BBQ…

Screen Shot 2015-07-15 at 4.13.00 PM

…slice them every 1-3 ribs…

Screen Shot 2015-07-15 at 4.13.21 PM

…and ENJOY some homemade rib goodness!

Screen Shot 2015-07-15 at 3.27.54 PM

[amd-zlrecipe-recipe:50]

Screen Shot 2015-07-15 at 5.23.14 PM

| Left: My Grill | Top Middle: Wood Grilling Planks | Top Right: Glass Bowls |
| Bottom Middle: Sheet Tray || Bottom Right: Boos Cutting Board
 

Desserts

Honey Whipped Frozen Yogurt

July 13, 2015

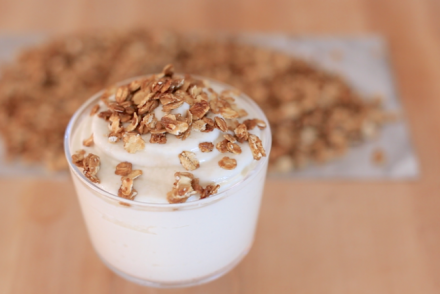
So it’s not technically ice cream…but it’s close enough! Finishing off #IceCreamWeek with a simple recipe for making Homemade Honey Whipped Frozen Yogurt—topped with sugar-toasted rolled oats! Hope you enjoy.

Screen Shot 2015-07-07 at 12.04.20 PM

Generously salt a bowl of ice (5-6 cups)…

Screen Shot 2015-07-07 at 12.04.41 PM

  …and top with secondary bowl.

Screen Shot 2015-07-07 at 12.05.13 PM

 Add 3 cups of greek frozen yogurt…

Screen Shot 2015-07-07 at 12.05.31 PM

…1/2 cup of honey…

Screen Shot 2015-07-07 at 12.05.48 PM

…and 1/2 cup of whole milk to the secondary bowl.

Screen Shot 2015-07-07 at 12.06.26 PM

Whisk for 5 minutes.

Screen Shot 2015-07-07 at 12.06.43 PM

Place in freezer to set up for 2 hours.

Screen Shot 2015-07-07 at 12.07.15 PM

Whisk every 10-15 minutes to ensure frozen yogurt freezes and blends evenly.

Screen Shot 2015-07-07 at 12.07.41 PM

OPTIONAL TOPPING: Add 1/4 cup brown sugar…

Screen Shot 2015-07-07 at 12.07.55 PM

…1 cup rolled oats…

Screen Shot 2015-07-07 at 12.08.11 PM

…and a pinch of salt to a pan on medium heat.

Screen Shot 2015-07-07 at 12.08.32 PM

Toast oats for 10 minutes, stirring consistently.

Screen Shot 2015-07-07 at 12.09.11 PM

Remove from heat.

Screen Shot 2015-07-07 at 12.10.36 PM

 Use a piping bag to serve the froyo in its traditional swirly way.

Screen Shot 2015-07-07 at 12.03.49 PM

Top it your way…

Screen Shot 2015-07-07 at 12.10.56 PM

…and ENJOY!

Screen Shot 2015-07-07 at 12.11.09 PM

[amd-zlrecipe-recipe:49]

Screen Shot 2015-07-07 at 5.14.09 PM

| Top Left: Piping Bag | Top Middle: Serving Glass | Top Right: Whisk |
| Bottom Left: Metal Bowls | Bottom Right: Glass Ramekins |

Desserts

Ice Cream “Cone” Bites

July 2, 2015

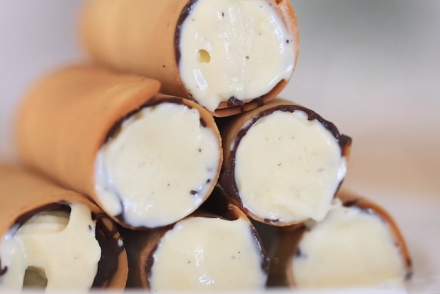
Mixed, baked, chocolate coated, ice cream filled, and ready to eat! I call them, Ice Cream “Cone” Bites, and they’re on a whole other level!

Screen Shot 2015-07-01 at 3.23.22 PM

In a medium mixing bowl, sift 1/2 cup of powder sugar…

Screen Shot 2015-07-01 at 3.24.04 PM

…and 1/2 cup of all-purpose flour.

Screen Shot 2015-07-01 at 3.24.52 PM

 Add 5 tbsp of unsalted butter and blend ingredients for several minutes.

Screen Shot 2015-07-01 at 3.25.22 PM

Whisk in 1 large egg white or 2 medium egg whites…

Screen Shot 2015-07-01 at 3.26.32 PM

….1 tbsp vanilla extract…

Screen Shot 2015-07-01 at 3.26.51 PM

…and a pinch of salt.

Screen Shot 2015-07-01 at 3.26.17 PM

The batter should have a smooth, paste-like texture when ready.

Screen Shot 2015-07-01 at 3.27.39 PM

Use a non-stick sheet pan and a rectangle stencil to begin forming the “cones.”

Screen Shot 2015-07-01 at 3.29.13 PM

Smear a dollop of batter evening across the stencil.

Screen Shot 2015-07-01 at 3.29.57 PM

 Remove stencil and bake for 5-7 minutes at 375°F.

Screen Shot 2015-07-01 at 3.30.31 PM

 Once a nice golden-brown, remove from the oven…

Screen Shot 2015-07-01 at 3.31.06 PM

…and begin rolling the hot pliable cookie around a cylinder form.

Screen Shot 2015-07-01 at 3.32.38 PM

Seal the inside of the cones with a smear of melted dark chocolate.

Screen Shot 2015-07-01 at 3.33.25 PM

Let them set up in the freezer for about 10 minutes.

Screen Shot 2015-07-01 at 3.34.28 PM

 Once ready, fill each cone with any flavor ice cream you desire! Using a pastry bag is the easiest way to do this.

Screen Shot 2015-07-01 at 3.34.42 PM

When they are all filled, return them to the freezer for at least 2 hours to set-up…

Screen Shot 2015-07-01 at 3.34.57 PM

…and then they are ready to enjoy!

Screen Shot 2015-07-01 at 3.35.44 PM

[amd-zlrecipe-recipe:48]

Screen Shot 2015-07-01 at 4.54.20 PM


| Top Left: Spatula | Top Middle: Cannoli Form | Top Middle: Pastry Bag | Top Right: Glass Bowl Set |

| Bottom Left: Silpat | Bottom Middle: Mixing Bowls | Bottom Right: Baking Sheet |